If you are having trouble logging in, use your email address on file with this site as the username. If you forgot your password, please use the password reset link. If you're still having trouble, contact Marsha@Geneshepherd.com
♥ ~BTWG

The Importance of a Good Lunch Break

I was out, bright and early

Dyeing wool that had soaked over night.

Then, in my other free time

I started working out the leaf scrolls on my Lincoln rug.

However, I am sure my energy would have wained were it not for the fact that I had a good lunch break.

My daughter Ruth and granddaughter Jane, both of whom had the day off, called insisting on taking us out for lunch.

The destination lunch was to Newport’s Crystal Cove Shake Shack.

I felt like a much better dyer and rug hooker after that lunch.

Holiday Weekend

I hope all of you had a wonderful holiday weekend.  I spent a lot of time dyeing and hooking on Friday and Saturday.  I also managed to get things ready to cook a Mother’s Day Lunch on Sunday for Marsha and my daughter Ruth.

Here is Marsha, on Mother’s Day, with our two daughters and our granddaughter.  I had a simple grilled chicken Caesar salad with homemade croutons.  After canvassing the two mothers present, I made a rhubarb pie for Marsha and a chocolate pecan pie for Ruth.  It was a very nice day to have a lunch in the garden.

OF course,

I had already spent a lot of time in the garden area on both Friday and Saturday.  Here is a big experimental batch of antique black I made for the HGA Workshop I will be doing in July.  It’s hard to tell from this photo but I made everything with out using any dye.

Although everything is darker in real like, there is still a lot of contrast between the original black pieces and the much lighter pieces that got over dyed by bleeding the black fabric.  It was really quite nice.

Here is another traditional dye technique I experimented with for that upcoming workshop.  Can you tell which one I used?

I’ll show this 2-yard experimental piece as a hint.

I experimented with my old tried and true transitional dye method to get that previous piece.

Why?

Sign up for the Dyeing Without Dye HGA Workshop in Wichita!

Back To Dye Pots Without Dye

Although I am moving into a mode where I seldom dye wool, I do some dyeing for myself and my students – particularly those that are trying to stock up before I give up my studio.

That said, I did quite a bit of dyeing on Thursday.  And even though this photo looks like every pot photo I have ever shown on this site, the stuff in the pots are quite different from what I normally dye.  (They are still cooling as I write.)

As mentioned a few times over the past months, I am getting ready to do a Dyeing Without Dye workshop at the Handweaver’s Guild of America’s biennial Convergence in Wichita, Kansas, in mid-July.  That is a very big convention – the last time I went they had about 1,200 attendees – and I have never taught for them before.  As workshops go, it’s a fairly simple 3 hour presentation, sort of like an interactive trunk show.  While I would just need comfortable shoes to do that for a bunch of rug hookers, weavers will be coming to this workshop for different reasons than hookers would, therefore necessitating that I adapt my rug hooking dye techniques to things that suit weavers.  That means I have to both adapt my techniques for weavers and then make visuals for the workshops.

For example:

Here is a marbleized twist like you have never seen me do before!  Each of the three pieces are half a yard, cut 18” on the selvedge and then torn across the bolt.  Normally, I do twists like this with quarter yards.  That’s perfect for rug hooking and perfect for my arms.  However, weavers really don’t need quarter yards of marbleized wool unless they are appliqué quilters.  I do think, however, bolt wide pieces of pretty wool could work for weavers who weave wool rag rugs, like I do.  After all, it would produce  long pieces that could be cut into 1″wide strips and then sewn together.  Sewing bolt wide long strips together is much easier than sewing lots more shorter pieces together.  Only problem is that such long pieces can’t be held by my arms for twisting, necessitating  I work out a process different from what I normally do.  In this case, I get that third hand by utilizing one of my very  heavy pattern weights.

It’s still rolled the same way …. just a bit of a challenge to do it.

However, I was able to get it done.

And, I think I can teach other people how to do it too.

After all, it’s just an adaptation of my basic process … just on steroids.

Should a weaver have extra yellow, teal and purple, they can turn 3 pieces into wide strips that have a different color on each side .  That gives 6 looks which, in my opinion, makes for more artistic options.  I’ve shown all 6 looks by just folding over each 5’ long piece to show the colors half and half, neatly placed on my 6 foot plastic table.

I think this would make for a very pretty rug … and it was all dyed without dye!

For The Most Part

For the most part

I have the center section of the Lincoln Parlor rug done.  Yes, there is a little leafy do dah sticking out on each side … but I think I am going to do something different there.  I want to put in some scroll work before I decide.  Whatever I put in that section, it won’t be too much to do and I think I will have a good feeling about it by the time some scroll work gets in.  I’m showing it here sideways

Maybe this close up is a better shot?

To get the full effect, it has to go this big.  However, it’s not very up close and personal.

From PEI

It’s nice to start any day with a report from Prince Edward Island IRgC reporter, Sue-Anne.

Hi Gene. 

Your graduation party for your granddaughter looked very festive…I love all the color!!

I’m reporting on an almost finished rug I’ve been working on for the past two weeks. 
As I am just “coming off” a big commission piece that took me 1 year plus 4 months to finish, it was fun to do a quick project like this!  It’s a free pattern from an issue of Rug Hooking magazine (circa 2005 I think!!!) 
I have some very pretty yarn for whipping and plan to do it in a herringbone finish.

This rug is 4ft x 31in and was commissioned by my sister-in-law for her husband. It’s the view from their cottage in Ontario, on Catchacoma Lake, near Peterborough. I hooked it all in a 5 cut.

For scale, I’ve sent a second shot.

Best Wishes – Sue-Anne

Dear Sue-Anne,  While I did like the photo of the professional models holding lake scene, You really got my attention when you mentioned it was all done with a 5.  As I’ve been working almost exclusively with a 5 for the last 3 weeks,  I know all to well how hard it would be to fill a space that size – with or without models for scale.  Nevertheless, it is lovely and I am sure it will be treasured.

The little RHM freebie was also fun to see.  Someone local has done that rug in the past year or two.  It is a nice little piece and your colors are marvelous … as is your wool.  However, I am glad you are doing the herringbone, not me!

My best to your hubby and all the hookers on PEI.    Gene

PS:  Doing all that decorating after church was a big job but, after it was up and people were filling the patio, it seemed very nice indeed.  My granddaughter certainly enjoyed it.

Shopping

I spent Monday morning shopping with my good friend John.

And, when I say shopping and John in the same sentence, that means we were at the wood shop.  Long time readers might remember having met my 86 year old friend a few years back.   He’s the craftsman that made the 1st century upright loom I operated a couple of years in the Walk Through Bethlehem program my church used to run during December.  If you can think it, John can make it … and he has all the tools to do it.  A professional builder and woodworker, he spent many years in the US operating a construction business, then switched to overseas work for about another 2.5 decades  before retiring.  That move came when he joined Wycliff Bible translators as their master construction guy.  If Wycliff was going to send 3 families to work with an unreached people group in a rain forester somewhere, John would go in first to build a housing compound and maybe a school or some other support building … or three.  Hes built and remodeled buildings all over the world in places you just cant imagine.  

So

When I was trying to decide what to do with these very decorative drawers from an old treadle sewing machine, John came to mind.  My daughter got these thinking she would add them to one of the square work tables I made a few years ago using iron sewing treadle bases from the Room of Requirement.  Turns out, these babies were too big and we never used them.  But, now that the R of R is being cleaned out, it’s either find a way to use them or dispose of them.  My daughter voted for using them.

So, I brought the sewing machine drawers and an old, painted, walnut oval table that had split into two pieces over to John.  (The base is still good and in the Room of Requirement.)

He started by planing that walnut top down to a perfect 1/2 thickness.  That made it look brand new and, thankfully, also took off all the paint and varnish accumulated on those pieces over the years.

Carefully measuring twice … or thrice, he could cut once.

When he said something about biscuits, I was dismayed as I had not brought any hot tea.

However

He was talking about wooden biscuits that would hold those odd pieces together when groves on the edges of the pieces had been cut and everything bound together

With lots of glue

And pressure.

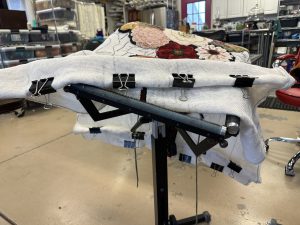
In less than three hours

John had everything put together, top and bottom, with a decorative, routed edge.  All we used were those old drawers and that “worthless” walnut table top.  All I have to do to finish everything is some light sanding, staining and varnish.  Maybe I’ll give it to my daughter … but I can see places I could use it too.

Knowing I was going to be in the shop with John, I decided to make a few more cuts wile there.

Although I’ve gotten a lot of use out of the original 36” square tables I originally made for those old sewing machine treadle bottoms – they’re actually being used in the studio right now – the future requires a smaller version.  This case, a 21” by 36” rectangle top, suitable for a computer table.  So, John happily trimmed down those two tops.

I brought those new tops home and quickly mounted the first to the treadle base I intend to use when I move.

I’m not done yet because I have the two drawers that went with this base – my great grandmothers machine.  Sections of these drawers need to be re-glued and clamped but I can do that on my own.  The other base will be put together without drawers and I suspect it will go to one of my girls.

As for mine, even without the drawers, I can use this table for work.

While many people whistle while they work

I like to treadle.

Big Event

It was a big weekend for us.

Our granddaughter,  Jane Locke, graduated from Biola University Saturday evening.  She received a BA in Bible, Theology and Ministry through Biola’s Talbot School of Theology.  It’s the only real graduation she’s had since her High School graduation, during Covid, was a drive through one where they just handed her diploma through a cracked window!  Therefore, getting a real graduation just four years later that came with a BA, was pretty special!

It was a great night for graduate, mom, grandparents and aunt.  Because the affair did not get over until almost 10 PM we had her real graduation party Sunday afternoon.

Because Sunday was May 5, she wanted a Mexican Fiesta.

This required a lot of decoration and the right food.

Her mother found some wonderful folded fans we could put together and I found all my outside clothes lines to hang them.

It never hurts having a fiber artist around when decorating for a big event, especially when something is needed to snap a decoration in place!

We also made lots of big paper flowers to go with several vases of fresh cut flowers from the store and grandma’s garden.

It made for pretty center pieces.

Mother Ruth spearheaded the making and serving of everything on the taco bar.  Grandma made carnitas, Ruth and friends made everything else, including the tortillas.

It was a beautiful afternoon in the garden – a great time to share with friends.

During the 3 hour event, 49 friends joined the party.  It was a lovely event.

A nice memory to have with our family.

Whipped Into Shape

Thursday found us, litterally

Whipping our projects into shape.  Or, at least one project got whipped.

Others are making very noticeable progress.

While we’ve been chronicling the hooking of the fine cut fruit rug on the right for the past few months, another member brought a finished version for show and tell.  After buying that pattern many years ago, she decided she wouldn’t hook it and got Norma Flodmon, Jane Olson’s sister, to hook it for her.  It was nice for all of us to see the different takes on this project.

I’m thinking this piece is on track for a December reveal.

There was some tweaking on this one – changing leaf colors here and there – as well as picking out the wool for all the other leaves.

Close … very close.

This one is also close … very close.

My contribution to the day centered on the efforts I made for for easier hooking.  I rolled up my long ends, clamping each side together.  The tails on that long rug slows down my hooking time as I continually get the lengths tightly wrapped around the center column.  By utilizing this clamping method, there is nothing hanging down to impede my progress.  That speeds up everything. Happily I got the last three leaves of one pointy end hooked on Thursday.  While my rug isn’t exactly whipped into shape, it’s been brought into submission.

Rough ReDo

I took a pause from hooking to prep for 1st Thursday, which meets this Thursday in my studio.  Although I didn’t have that much do to get ready, I spent most of the morning and part of the afternoon doing it.  After all, even when you only wash dishes once a week, it takes a pan or two of hot water to do it.  And, the freedom of having my Lincoln wool spread all over the place has to be given up if students are coming in.  So, I did all that tidying.

I also had one little redo to do.

Babara wants to hook a pattern that looks like this.  Unfortunately, she bought a sheep pattern with a fairly plain sheep basically shaped like this but with lots of houses and no real grass.

She said:  Can you just redo the sheep so it looks sort of like this?

The short answer is yes … except I just have to find time to do it, which I did on Wednesday.

However, there were some issues.

Barbara’s new plan required a square plan and her pattern was rectangle … which was no problem to change as I just edited out some on each side.

Her sheep, however, only had 2 legs drawn in and the inspiration pattern had 4, a detail neither of us noticed before I started redrawing, although I must admit that most of the sheep I have seen in the US, England and Australia have 4 legs too.  After a consult with her about how many legs she wanted her sheep to have, I drew in two more.  Actually, I drew the new, foreground leg twice as I didn’t like where it was on the first go round.  Even so, this is still a better plan as how would this sheep even get around without 4?

The old sheep pattern was too skinny, so I added several pounds to the redo with a new arc from the jaw to the foreleg of her pattern.   It also makes the sheep appear to be turning in  just a little, which she can now do with 4 legs.

I created a slopping hill under the sheep, which was easy … and we are just going to ignore the houses, although, as I was working on the redo, we did experience a 4.3 earthquake … so consider the houses demolished without me bothering me to cross out anything.

Most of my time, however, has been putting in padulla  flowers on the body of the sheep.  This is just an artistic addition, which I will space out over at least two days.

I will do a final consult on Thursday after she arrives but, for the time being … and in case she wants more legs or different legs … I’ve got enough done for 1st Thursday to begin … I hope.

One More Major Motif

I spent about 5ish hours hooking on Tuesday.  About 3 in the morning and 2 and a little more in the afternoon.

The vast majority of that time was spent working out the sea shell, which is a major motif.  Like the center flowers, it’s mostly hooked with a #5 cut.  Given the fact that there are pink opalescent sea shells owned by the Lincoln’s in the front parlor, as well as in an other room in the house, I wanted to make sure  I got the colors about right.  Therefore, I did a sea shell tutorial earlier in the week to find some examples that allowed me to use white, various pinks and some pale beige colors – all colors already used in four of the big flowers in the center.

I was happy to get that shell motif worked out, as well as put in more of that center stripped background.  My only disappointment with the project thus far is that the center stripes just don’t show up very much in the photos.  In person, however, they are quite noticeable.